

Soldering firmly secures the components of an electronic unit. Here is the step by step guide to do soldering.
Connect the soldering iron to the mains. It will take some time to get heated.
Insert the component at its position properly. Bend the lead of the components outward.
Hold the iron as you hold a pen or pencil in one hand and solder wire in other hand.
Place the iron at an angle of 45 degrees with its tip touching the component lead and the PCB.
Place the solder wire near the iron. The solder will start melting,let it flow around the joint.
When the solder has successfully flowed around the component’s lead and track of PCB, take the solder wire away and then remove the iron. Pull away the solder first and then the iron after few seconds. This allows solder to continue to melt and cool forming a good joint.
Do not touch the component or allow it to move until the solder has cooled. The solder when solidifies appears as a bright solid and flake free surface.
After soldering the component, cut off the excess leads.
Always use a soldering iron stand to prevent hot iron from rolling over and touching the mains cord.
A goodworkman always has clean tools. Clean the tip of iron before soldering.
Use iron with three pin plug for your safety. Do not touch the hot tip of soldering iron.
Do not use excess solder because it might block the unused holes.
Do not sit under the fan while soldering.
The PCB or component should not vibrate while soldering – otherwise, the joint will be badly soldered and is called ‘dry joint’.
Be safe and have fun while experimenting.
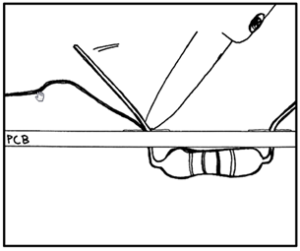

Image credit: Soldering Is Easy Comic Book)
Recent Comments