Before working on this activity, please read
Material Required: LED, Resistance: 10Ω (Brown, Black, Black)
100Ω: Brown, Black, Brown
330Ω: Orange, Orange, Black
1 KΩ: 1000Ω Brown, Black, Red
4.7KΩ: 4700Ω Yellow, Violet, Red,
Cell Holder, two pencil cells and a probe
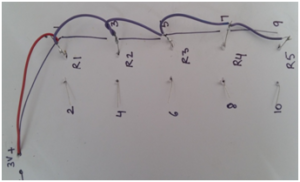
- Draw the circuit on the board. Mark the resistance R1, R2, R3, R4 and R5. The resistances are fixed in the increasing order of their value. Insert the resistance with corresponding color code at their place. Insert the LED at its place, check the polarity before inserting (shorter leg:-ve).


2.Label the LED, resistance and their end points at the back of the board also.

3.Mark two holes for fixing cell holder. These points are labeled B1 and B
4.Join point 1,3,5,7 and 9 using soldering iron and connecting wire. (Remember three steps cut, peel and wrap for preparing the wire for soldering) Thus we have joined one end of the each resistance together.


5.End 1 of resistance R1 is to be joined to positive of the cell holder B1. Solder a wire from R1 (Red) and take it out from +ve of 3v supply.


6.Cathode (-ve) of the LED is to be connected to the negative of the cell holder. For that, solder one wire from the shorter leg of LED and take out its other end from –ve of 3v supply.


7. Take a look at probe, its one end is metallic. Peel the wire at the other end and join the wire end to the positive, (longer leg) of LED.


8.Now turn the board. Solder the red wire to positive of the cell holder and black wire to the negative of cell holder. (Tin the cell holder and prepare the wire before soldering)


The circuit is complete. It’s time to test!!!


9.Touch the loose end (metallic) of the probe to point 2, the circuit gets completed with R1. Since R1 is very low 10Ω, more current is supplied to LED and the LED glows up brightly.

10.Next touch the probe to point 4, 100Ω (R2) becomes part of circuit now. LED is not that bright as it was with R1.

11. Touch the probe to point 6, with 330Ω resistance, LED loses its sheen and gets dimmer.

12.Touch the probe to 1KΩ resistance, LED reduces further.

13.Touch the probe to point 10, now the resistance is 4.7 KΩ (4700 Ω). The LED is very dim.

So, we have seen that as we keep on increasing the resistance of the circuit, current keeps on decreasing. Thus this activity verifies the fact that resistance empowers us to control the current in any circuit.


I like it mam.